Step 3: Configure, Design and Tweak your blog
In this section, I’ll show you some WordPress blog basics, including:
- Getting familiar with WordPress dashboard
- Changing your blog’s design
- Installing new plugins/features
- Making your blog search engine friendly
If you’ve set up your blog, you’re now ready to start using WordPress and customizing your blog. I promise – it’ll be pretty easy and fun at the same time.
Remember: You can log in to your blog by going to www.yourblog.com/wp-admin/ and using the credentials you set up with HostGator or any other hosting company you used.
Understanding the WordPress Dashboard
When you log in for the first time, you’ll see a dashboard or admin panel that looks something like this:
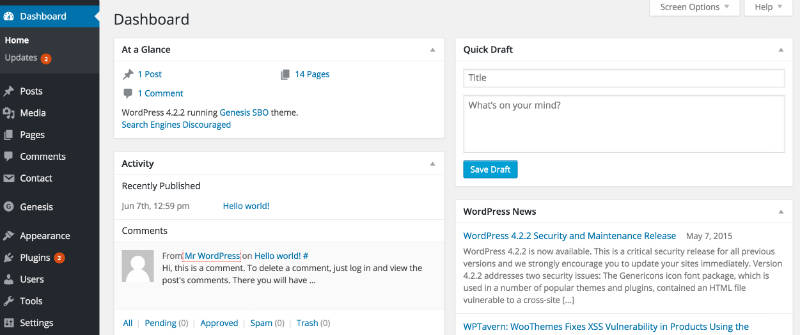
Let’s break down some of the most important ones for new bloggers to know:
- “Dashboard” shows you an at-a-glance look at your recent activity, including how many posts, comments and pages you have. You can also write up a quick draft blog post here – but don’t – I’ll show you a better way a little later in the guide.
- “Posts” is where you’ll click if you want to add a new blog post or edit an existing one.
- “Media” is the library of all the pictures, videos, and audio files you’ve uploaded to the site. You can manage all of those items here.
- “Pages” is where you can add a new permanent page – like a services or contact me page (not a blog post!) and manage the pages you’ve already created.
- “Comments” is the place you’ll want to go to manage comments. You can see which comments are waiting for your approval, review comments you’ve approved, see which comments WordPress has labelled as spam and delete comments you don’t want.
- “Appearance” – this is where you can edit your blog’s design and install new themes and layouts. I show you exactly how to do this a little later in the page.
- “Plugins” is where you’d click if you wanted to install a new plugin, like a photo gallery or SEO tool. I’ll show you how to do this in a moment.
- “Settings” is the last section you need to know about. Here, you can change your site’s title and tagline, edit your email address and manage all of your site’s important settings.
Changing Your Blog’s Design (Themes & Layouts)
WordPress blogging platform uses design templates called “Themes” to figure out how your site should look. Changing your blog’s layout and design is as simple as installing a new theme.
There are over 2,000 professionally designed, fully-customizable and free themes to choose from – so you’ve got a lot of options. If you want to see more premium type of templates and themes, head over to ,
Here’s how to find and install a theme you love:
Mouse-over the “Appearance” tab in the WordPress sidebar, then click on “Themes”.
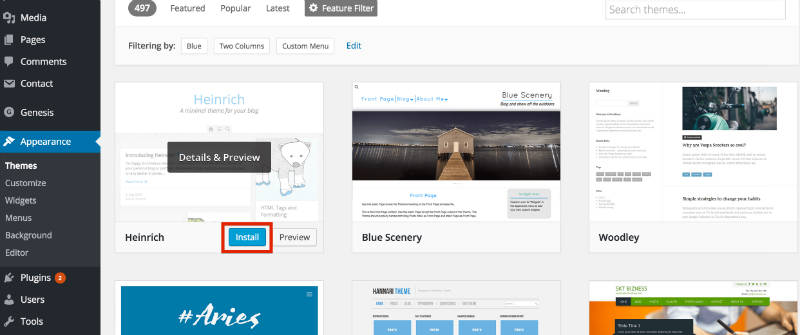
On the next screen, you’ll see several themes are already installed. If you don’t like those, click the “Add New” button at the top, or the great big “Add New” square to start searching for a theme.
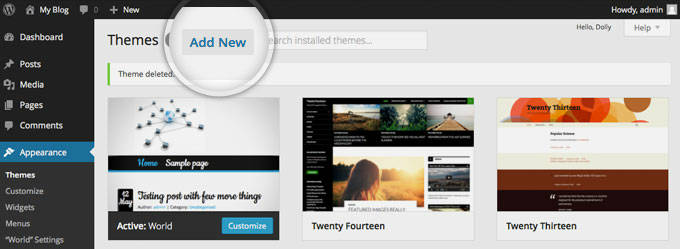
Now, you’ll see tabs where you’ll find featured, popular and brand new themes, as well as a “Feature Filter” and search bar.
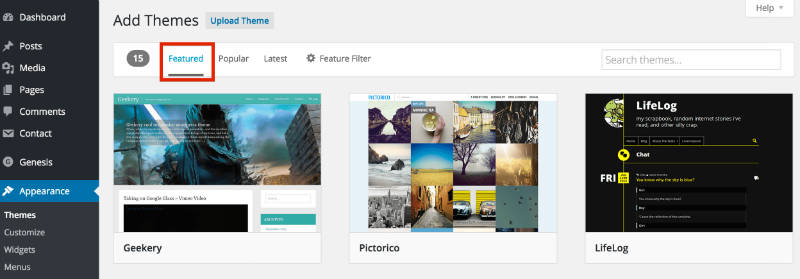
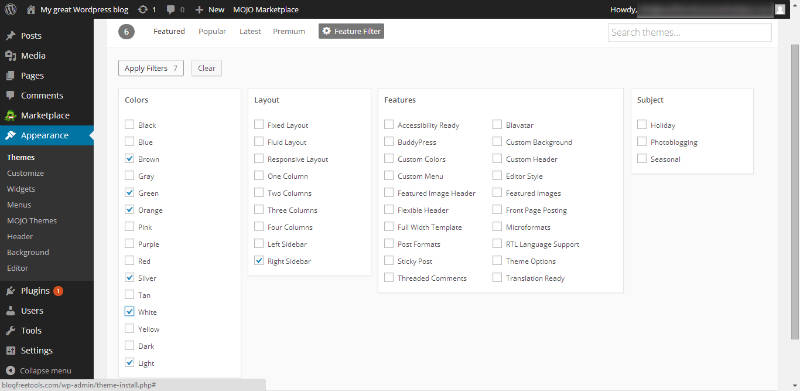
I really like the “Feature Filter” option, because you can choose themes in certain color schemes, select specific layouts and even choose themes with built-in advanced features.
Just choose the options you want, then click “Apply Filters” on the left hand side. If you’re finding this challenging, just search by keyword – there’s no wrong way!
When you’ve found a theme you like, click “Install”. You’re nearly done!
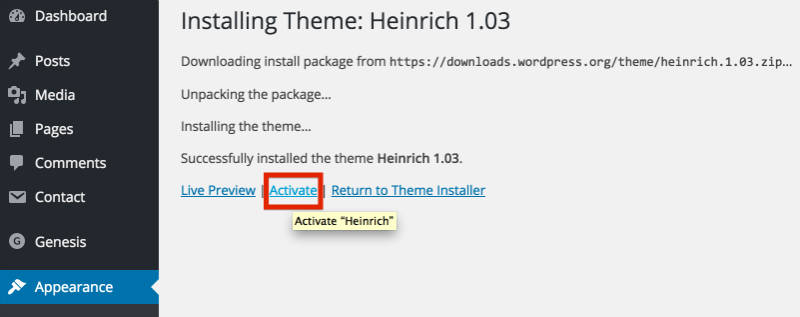
Once the theme has been installed, all that’s left to do is click “Activate” on the next screen:
Installing a New Plugin (add some cool features to your blog)
“Plugins” are little software modules that you can install to add features and tools to your blog. They can do all sorts of things, like:
- Adding contact forms
- Reducing comment spam
- Making your blog SEO-friendly
- Creating newsletter sign-up forms
- Adding photo galleries
And lots, LOTS more.
Installing them is really easy. First, Mouse-over “Plugins” in the sidebar, then click “Add New”.
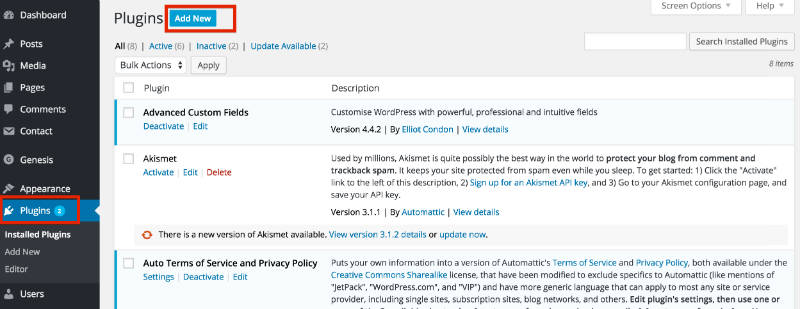
Now, you can search by keyword to find plugins for almost anything!
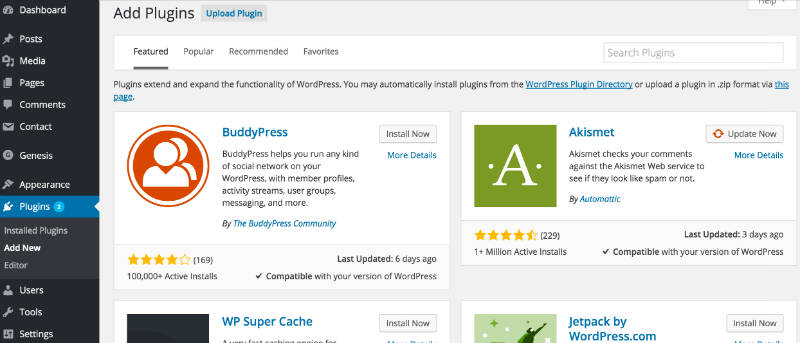
When you find a plugin you like, just click “Install Now” and then “Activate Plugin” on the page that follows.
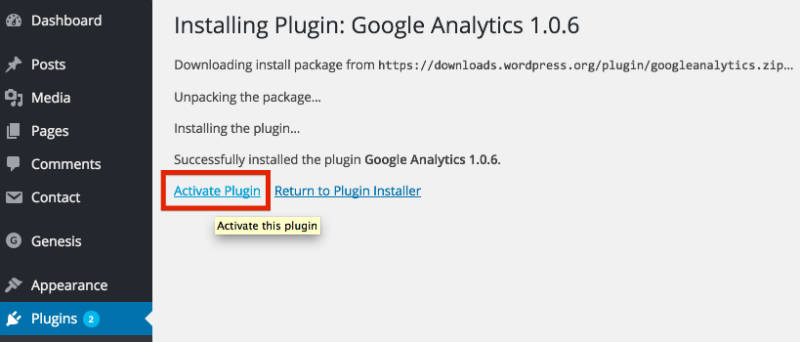
BE CAREFUL: Before you install any plugin, it’s a smart idea to Google its name and read reviews. Some plugins can break your theme, cause problems with security, or just plain work poorly, so always get a second opinion first.
Also, make sure your plugins (and themes) are always up-to-date. Don’t worry though, WordPress usually lets you know when some of them are out of date.
If you don’t know which plugins to use at first, have a look at my blog post – “Top plugins for WordPress blog that I personally use“.
Configuring your blog to be search engine friendly
There are some things you’d need to do to make your blog more search engine friendly. Search engines do not like two things:
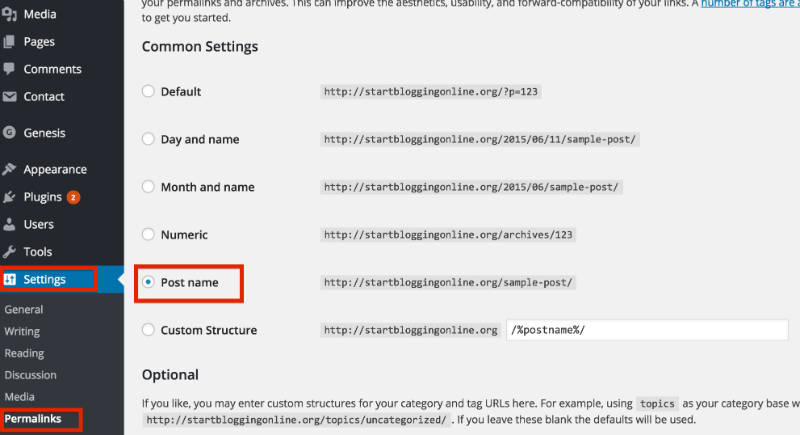
- Ugly and clumsy URL-s – http://yourblog.com/2012/04/topic-a/author-Karen/how-to-start-a-blog. A much better way is to use: http://yourblog.com/start-a-blog
See the difference? One is filled with irrelevant information and the another one is short, clean and neat.
In order to change your links to a more cleaner, click on the “Settings” -> “Permalinks” and use the following settings:
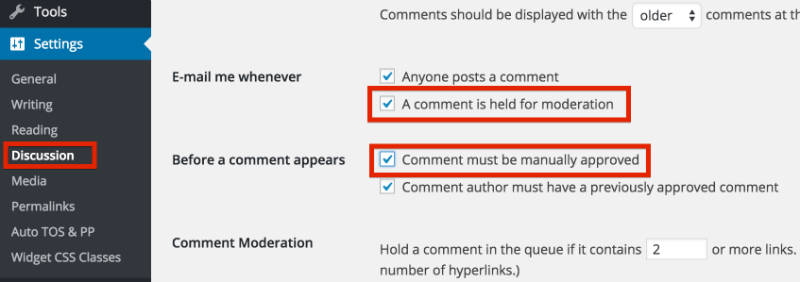
2. Spam comments – Unfortunately, lots of people want to leave automate spam comments on your blog. They do that for couple of reasons – to get people from your blog to their blog and to advertise their services/products.
To avoid that, make sure you moderate your comments. Here’s how to do that: Go to “Settings” -> “Discussion” and tick those two options.
Managing Your User Information
If you ever need to change your user details, password, or add another user so someone else can access your blog, it helps to know how to manage your user details.
To manage users, mouse-over the “Users” tan on the left-hand menu.
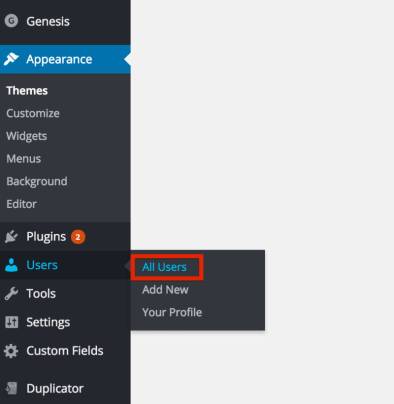
Adding a New User
Click the “Add New” link in the users section of the left-hand menu, and you’ll be brought to this page:
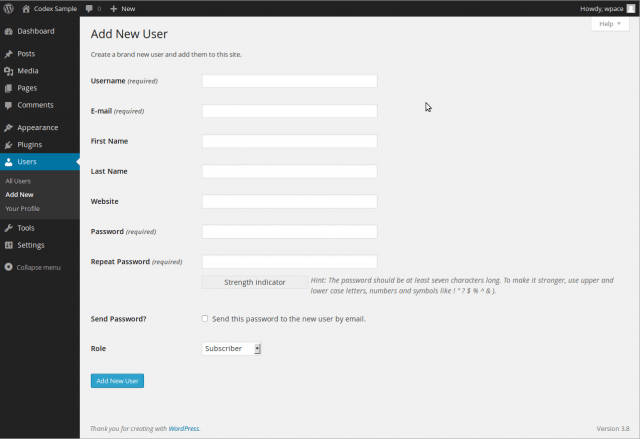
Fill in the details for the user you’d like to add – including a password you can remember to share with them. You can send it to them via email by clicking the radio box option – but that’s not always the most secure way to do things.
BE CAREFUL: The “Role” you choose from the dropdown menu will determine what your new user is able to do.
- “Subscribers” are only able to manage their own profiles – not update or change content.
- “Administrators” can access all the administration options – making any changes or adding new users.
- “Authors” can publish and manage their own posts, but nothing else.
- “Contributors” can write and manage their own posts, but cannot publish them.
- “Editors” can publish and manage posts – including the posts of other users.
Don’t give access to anyone who doesn’t need it!
